Unlock Your Baking Mastery: Must-Have Tools for Crafting Perfect Bread
Baking exceptional bread is not just a pastime; it’s a sophisticated art that intertwines creativity with scientific precision. Whether you’re a novice embarking on your baking journey or a seasoned baker refining your craft, investing in the right tools for baking perfect bread can significantly elevate your breadmaking capabilities and enhance your overall experience. Let’s dive into three essential tools that will set you on the path to baking success.
Enhance Your Dough Management with a Multi-Functional Dough Scraper
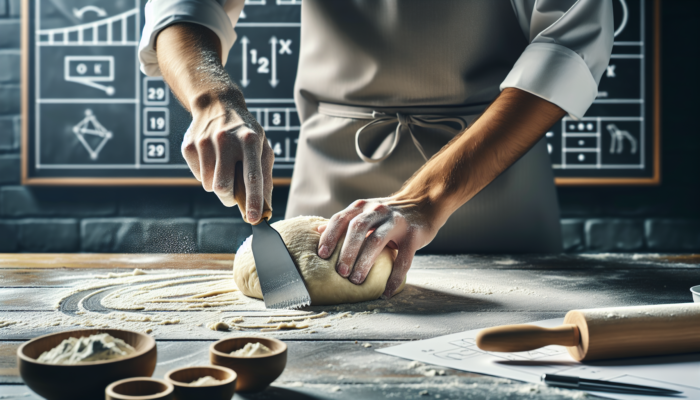
A dough scraper, commonly referred to as a bench scraper, is an indispensable tool for any serious baker. While its primary purpose is to assist in managing dough, its versatility extends far beyond basic scraping duties. This essential tool allows you to effortlessly cut, shape, and transfer dough, making it a crucial asset for anyone dedicated to crafting exceptional bread.
When faced with sticky or wet dough, a dough scraper becomes your best friend. It enables you to lift and fold without creating a chaotic mess, thereby maintaining the structure and integrity of your dough. Additionally, a dough scraper is perfect for keeping your workspace tidy, allowing you to gather scraps and maintain an organized environment. Most dough scrapers are designed with ergonomic features for improved grip, facilitating precise movements as you shape your culinary masterpieces.
Investing in a durable, stainless steel dough scraper can transform your baking endeavors. The weight of a metal scraper provides the control needed for detailed tasks like shaping artisan loaves. Moreover, they are easy to clean and maintain, ensuring that your essential tools for baking perfect bread remain in excellent condition for years to come.
Achieve Baking Precision with a High-Quality Digital Scale
In the realm of baking, precision is vital, making a reliable digital scale an essential tool for accurately measuring your ingredients. Unlike measuring cups, which can introduce inconsistencies due to factors like packing or settling, a digital scale provides precise measurements in grams or ounces. This level of accuracy is crucial for achieving consistent results every time you bake.
In bread baking, even minor variations in ingredient quantities can dramatically impact the final product. A digital scale allows for precise weighing of flour, water, and yeast, which is essential when trying new recipes or tweaking hydration levels. With this tool, you can trust that your measurements are spot-on, paving the way for reliable and repeatable baking successes.
Furthermore, many digital scales come equipped with a tare function that allows you to reset the weight of your mixing bowl to zero. This feature simplifies the measuring process, ensuring that you incorporate the right ingredients into your dough accurately. By integrating the digital scale into your baking routine, you create a solid foundation for exceptional breadmaking.
Enhance Your Dough’s Rise with a High-Quality Proofing Basket
A proofing basket, often known as a banneton, is a traditional baking tool that plays a pivotal role in the breadmaking process. This specialized tool cradles dough during its rise, providing essential shape and support while facilitating proper airflow. Typically made from natural materials like rattan, the unique design of a proofing basket helps absorb excess moisture, creating an ideal environment for effective dough proofing.
Using a proofing basket can significantly enhance your breadmaking experience. Not only does it support the dough, but it also leaves a charming pattern on the crust, boosting the visual appeal of your baked goods. Once your dough is primed for the oven, simply invert the basket onto your baking surface to unveil the stunning spiral pattern it creates.
Choosing the right size for your proofing basket is crucial, depending on the type of bread you plan to bake. Smaller baskets are perfect for boules, while larger options are better for batards. Investing in a high-quality proofing basket will enrich your breadmaking routine, ensuring your dough rises beautifully and bakes evenly.
Master the Techniques of Bread Baking for Outstanding Results
Having gathered the essential tools for baking perfect bread, it’s time to dive into the techniques that will elevate your bread from merely acceptable to truly extraordinary. Mastering kneading, proofing, and scoring are critical skills that can turn your baking attempts into remarkable culinary achievements.
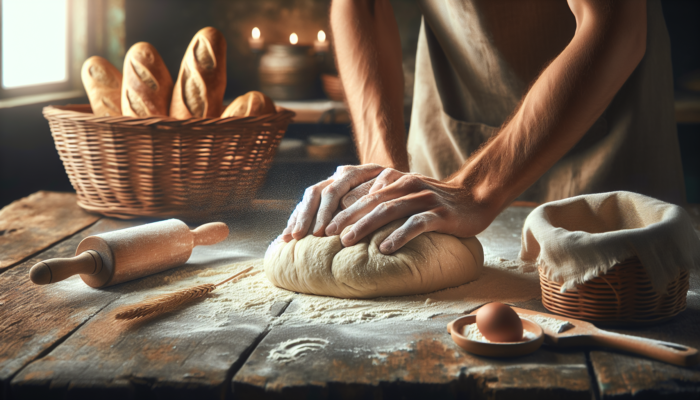
Refine Your Kneading Techniques: Developing Gluten for Superior Bread Texture
Kneading is a fundamental technique that develops gluten, the protein responsible for the structure and chewiness of bread. Understanding various kneading methods can significantly influence your breadmaking journey. While the traditional hand-kneading approach offers a satisfying and therapeutic experience, a stand mixer can also accomplish this task efficiently.
When kneading by hand, focus on techniques that involve stretching and folding the dough. This method aligns the gluten strands, forming a strong network that captures gases during fermentation. If using a stand mixer, closely monitor the dough to avoid over-kneading, which can result in an undesirable tough texture.
Incorporating the windowpane test is another effective technique. This test allows you to determine whether the gluten has developed sufficiently by stretching a small piece of dough between your fingers. If the dough stretches thin enough to let light shine through without tearing, you’re on the right path. Mastering kneading techniques guarantees that your bread achieves the perfect texture, making each bite an extraordinary experience.
Fine-Tune Your Proofing: Leveraging Time and Temperature for Optimal Dough Rise
Proofing, or fermentation, is a crucial phase in the breadmaking process. During this vital time, yeast consumes sugars present in the dough, producing carbon dioxide that causes the dough to rise. The temperature and duration of proofing can drastically impact both the flavor and texture of the final product.
There are two main types of proofing: bulk fermentation and final proofing. Bulk fermentation occurs after kneading, allowing the dough to rise before shaping. This phase is essential for developing robust flavor and texture. Final proofing takes place after shaping the dough and just before it’s ready for baking.
Temperature plays a crucial role in proofing. Warmer environments accelerate fermentation, while cooler conditions slow it down. Generally, aim for a temperature around 24-27°C (75-80°F) for optimal yeast activity. To check if your dough is ready, gently press it with your finger. If the indentation springs back slowly, it’s time to bake. Mastering proofing techniques will ensure your bread rises perfectly and develops deep, rich flavor.
Artistry in Scoring: Creating Beautiful and Functional Designs on Your Bread
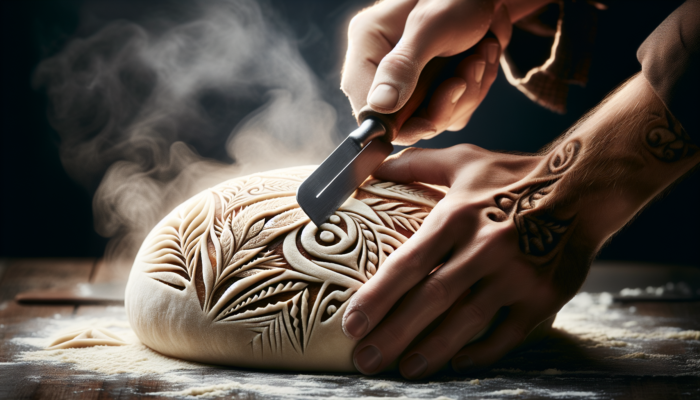
Scoring, or slashing the dough before baking, serves not only as an aesthetic touch but also as a crucial technique that allows steam to escape, preventing the dough from bursting unexpectedly. The way you score your bread can significantly influence its final appearance and texture.
Using a sharp blade like a bread lame, practice making clean cuts on the surface of the dough. Depending on your skill level, common patterns can range from a simple cross to more intricate designs. The depth and angle of your cuts will greatly affect how the bread expands in the oven, a phenomenon known as “oven spring.” Deeper cuts allow for greater expansion, while shallower cuts yield a more subtle effect.
Scoring also provides a wonderful opportunity to showcase your creativity. Experiment with various designs and patterns to give your loaves a distinct flair. With practice, your scoring skills will enhance both the functionality and artistic presentation of your bread, elevating your baking to a professional level.
Explore the Science of Bread: Understanding Key Ingredients for Your Loaves
To excel in bread baking, it’s essential to grasp the ingredients that work together to create the perfect loaf. The primary components are flour, yeast, and water, each possessing unique properties that directly influence the final product.
Flour: Understanding Different Types and Their Impact on Bread Quality
Flour serves as the foundation of any bread recipe, and recognizing the various types available is vital for achieving the desired outcomes. The most common varieties include all-purpose, bread, and whole wheat flour. Each type has varying protein content, which plays a significant role in gluten development and the overall texture of the bread.
Bread flour, known for its higher protein content, is ideal for yeast breads as it provides the necessary structure for a good rise. While all-purpose flour can suffice in a pinch, it may not yield the same chewy texture. Whole wheat flour, on the other hand, adds a nutty flavor and denser crumb but often requires additional hydration due to its higher bran content.
When experimenting with flours, consider blending different varieties to achieve your desired texture and flavor. For instance, combining bread flour with whole wheat can create a delightful balance of chewiness and depth. Understanding the various types of flour and their characteristics is fundamental to mastering the art of baking perfect bread.
Yeast: Understanding Its Essential Role in Fermentation and Dough Rising
Yeast is a living organism that plays a vital role in fermentation, converting sugars into carbon dioxide and alcohol. This gas is what causes the dough to rise, giving your bread that delightful airy texture. There are various types of yeast available, including active dry, instant, and fresh yeast, each with its unique properties.
Active dry yeast requires activation in warm water before use, while instant yeast can be added directly to dry ingredients, making it a convenient choice for quick baking. Although less common, fresh yeast offers a robust flavor and is often preferred by professional bakers.
Understanding how to manage yeast is critical; factors such as temperature, sugar content, and hydration levels can greatly influence yeast activity. Paying attention to these elements ensures you achieve the perfect rise and flavor in your bread. Mastering the science of yeast will unlock the secrets to consistently exceptional bread.
Water: The Crucial Role of Temperature and Hydration Levels in Dough
Water is a vital yet often overlooked ingredient in the breadmaking process. The temperature and quantity of water used can significantly affect dough development and fermentation. The ideal water temperature for activating yeast falls between 38-43°C (100-110°F).
Hydration levels also play a critical role in determining the quality of bread. Higher hydration doughs yield a lighter, airier texture, while lower hydration results in denser loaves. Experimenting with various hydration levels can yield exciting results, allowing you to customize your bread to your liking.
It’s essential to account for the water content in your recipes, especially when working with whole-grain flours, which typically absorb more moisture. Adjusting hydration levels can dramatically impact your bread, making it a crucial factor in crafting that ideal loaf.
Your Comprehensive Buyer’s Guide to Essential Tools for Baking Perfect Bread
Now that you’re familiar with the ingredients and techniques involved, it’s time to explore the essential tools that will elevate your bread-baking experience. Making informed investments in high-quality tools will ensure that your journey into breadmaking is both rewarding and successful.
Stand Mixer: Key Features to Look for When Choosing Your Perfect Model
A stand mixer can significantly enhance your breadmaking process. When selecting the right model, focus on features that improve functionality and ease of use. A powerful motor is essential for efficiently kneading dough, while a spacious mixing bowl is ideal for handling larger batches.
Look for models that come with various attachments, such as dough hooks, specifically designed for kneading, which saves you both time and effort. A tilting head or lift design enhances accessibility, making it easier to add ingredients.
Investing in a high-quality stand mixer can streamline your baking process, freeing up time and energy so you can concentrate on refining your technique. With the right stand mixer by your side, you’ll find yourself baking bread more frequently, experimenting with new recipes, and savoring the fruits of your labor.
Oven Thermometer: Ensuring Accurate Temperatures for Consistent Baking Success
Temperature accuracy is critical in baking, and an oven thermometer is an indispensable tool for any serious baker. Many ovens can have temperature discrepancies, leading to unpredictable baking results. By placing an oven thermometer inside your oven, you can confirm the actual temperature and make necessary adjustments.
Proper oven temperature is crucial when baking bread, as it guarantees that the bread rises correctly and develops a beautiful crust. Most bread recipes recommend a temperature range of around 190-220°C (375-425°F). An oven thermometer will help you achieve this consistently, resulting in perfectly baked loaves every time.
Additionally, consider using a baking stone or steel alongside your oven thermometer. These tools effectively retain heat, promoting even baking and resulting in a crust that is both crunchy and flavorful. Together, they form a powerful combination for successful bread baking.
Baking Stone: The Benefits of Using a Stone for Even Heat Distribution
A baking stone is another essential tool that can significantly enhance your bread-baking outcomes. By providing a consistent and even heat source, a baking stone aids in achieving a beautifully baked crust while retaining moisture inside the loaf.
When preheated, a baking stone absorbs heat and radiates it evenly, mimicking the conditions of a traditional brick oven. This feature is particularly advantageous when baking artisan breads, which necessitate high temperatures for optimal crust development.
For best results, preheat your baking stone for at least 30 minutes before placing your dough on it. The stone will ensure your bread rises swiftly, leading to a delightful oven spring and producing a professional-quality loaf. Investing in a quality baking stone will enhance your breadmaking experience and empower you to confidently explore new recipes and techniques.
Transform Your Home Baking Experience: Evolving from Novice to Expert
With the right tools and knowledge, anyone can master the art of baking perfect bread at home. Whether you’re just getting started or aiming to refine your skills, numerous steps can elevate your baking game.
Beginner’s Guide: Essential Steps to Kickstart Your Bread-Baking Adventure
Starting your bread-baking journey can be both exhilarating and intimidating. Begin with straightforward recipes that require minimal ingredients and techniques. Basic white bread or no-knead recipes are excellent starting points for newcomers, allowing you to focus on mastering fundamental skills.
Familiarize yourself with the essential tools for baking perfect bread mentioned earlier. A digital scale, dough scraper, and proofing basket will streamline the process and increase your enjoyment. Don’t hesitate to experiment with various flours and hydration levels as you build confidence in your abilities.
Finally, embrace the entire baking process. Bread baking is as much about the journey as it is about the end result. Keep a baking journal to document your experiences, noting what works and what doesn’t. Celebrate your successes while learning from your failures. With patience and practice, you’ll achieve new heights in your baking endeavors.
Advanced Techniques: Challenging Recipes for the Experienced Baker
Once you have mastered the basics, it’s time to challenge yourself with more intricate recipes and techniques. Consider venturing into sourdough, which requires a deeper understanding of fermentation and flavor development. Creating your starter can be a rewarding endeavor, allowing you to experiment with wild yeast and enhance the flavor of your bread.
Other advanced techniques include shaping and scoring for artisanal breads, as well as experimenting with various flour types and add-ins like herbs, cheese, or nuts. These elements can introduce depth and character to your loaves, showcasing your creativity as a baker.
Engage with the baking community, whether online or in-person, to gain insights and share experiences. Interacting with fellow bakers can inspire fresh ideas and techniques to further enhance your skills. Remember, the baking journey is ongoing, and there’s always something new to learn.
Troubleshooting: Identifying Common Baking Challenges and Their Solutions
No baker is immune to occasional mishaps. Understanding common baking issues and their solutions is crucial for improvement. For example, if your bread fails to rise, it may be due to inactive yeast or insufficient proofing time. Always check the expiration date of your yeast and ensure it is stored correctly.
If your bread turns out excessively dense, consider adjusting your hydration levels or kneading duration. A well-kneaded dough will possess a strong gluten structure, allowing for optimal gas retention. Conversely, if your bread rises too quickly, it may be due to high kitchen temperatures or overly active yeast.
Keep a troubleshooting guide handy for reference as you encounter challenges. Learning from your mistakes will only enhance your skills as a baker. With patience and perseverance, you will overcome these hurdles, leading to the perfect loaf every time.
Enhancing Your Baking Skills: Additional Tools for Bread Making
As you progress in your baking journey, consider incorporating additional tools to elevate your skills and results. Each of these tools offers unique benefits that can enhance your breadmaking experience.
Bread Lame: Achieving Precision Scoring for Stunning Loaves
A bread lame is a simple yet powerful tool for scoring dough with precision. With a sharp blade, you can create intricate designs that elevate the visual appeal of your bread. Clean cuts ensure that your dough expands appropriately during baking, resulting in a well-formed crust.
Initially, using a lame may seem daunting, but with practice, you’ll develop confidence and control. Experiment with various patterns and styles to discover your unique signature. A well-scored loaf not only looks impressive but also boasts an even texture and crust, making it a valuable addition to your collection of essential tools for baking perfect bread.
Bench Knife: A Multi-Purpose Tool for Dividing and Shaping Dough
A bench knife is an invaluable tool for any baker. This versatile implement enables you to easily divide dough into portions, making it perfect for shaping rolls or loaves. Its flat edge also assists in transferring dough to a surface without losing any precious material.
When working with stickier dough, a bench knife will help you lift and fold without creating a mess. Consider investing in a sturdy, stainless steel bench knife that can withstand regular use. With this tool in your arsenal, the breadmaking process will become more efficient and enjoyable.
Couche Cloth: Supporting Dough During the Final Proofing Stage
A couche cloth is a specialized type of linen that provides support for dough during the final proofing stage. This tool is especially beneficial for shaping baguettes or artisan loaves, as it helps maintain structure and prevents the dough from spreading excessively.
Using a couche cloth involves placing the shaped dough on the fabric, allowing it to rest and rise while being gently cradled. The cloth’s natural fibers absorb moisture, resulting in a crust with an appealing texture. Furthermore, it adds a professional touch to your bread-baking routine.
As you advance in your baking journey, a couche cloth will become an essential part of your process, enabling you to create stunning loaves that impress your friends and family.
The Joy of Baking: Discovering Diverse Bread Varieties
With the right tools and techniques, bread baking unveils a world of endless possibilities. Explore different bread varieties to expand your skills and delight your palate.
Sourdough: Mastering the Art of Natural Fermentation
Sourdough is a timeless bread that has captivated bakers around the world. Its unique flavor profile emerges from natural fermentation, relying on wild yeast and bacteria. Mastering sourdough requires patience and practice, as you’ll need to cultivate a starter and understand the fermentation process.
Once you’ve established your starter, you can experiment with various hydration levels, flours, and flavorings. The beauty of sourdough lies in its adaptability—each batch can possess its unique character based on the environment and ingredients used. Embarking on the sourdough journey can be both challenging and rewarding, fostering a deep connection to the craft of bread making.
Baguette: Techniques for Achieving the Perfect Crust and Crumb
The baguette is an iconic bread known for its crispy crust and airy crumb. Achieving the perfect baguette requires mastering shaping techniques and understanding the fermentation process. Longer fermentation times can enhance flavor and texture, while careful shaping ensures an even rise during baking.
Utilizing a baking stone and a steam tray in your oven can significantly contribute to achieving that desired crust. The steam creates a humid environment that allows the bread to expand before the crust sets, resulting in a beautifully baked baguette. With practice, you can replicate this classic French bread in your own kitchen.
Whole Grain: Infusing Nutritious Ingredients into Your Bread
Whole-grain bread is an excellent way to incorporate nutritious ingredients into your baking. Utilizing whole-grain flour adds fiber, nutrients, and a rich flavor to your bread. When baking with whole grains, it’s essential to understand how they absorb moisture differently, which may necessitate adjustments in hydration levels.
Experimenting with various grains, such as spelt, rye, or oat flour, can introduce new flavors and textures to your bread. Additionally, consider adding seeds or nuts for extra crunch and nutrition. Whole-grain bread not only nourishes your body but also provides a fulfilling baking experience.
Essential Tools for Baking Perfect Bread: Caring for Your Equipment
Having the right tools is just the first step; properly maintaining your equipment ensures longevity and optimal performance. Here are some valuable tips on how to care for your essential tools for baking perfect bread.
Cleaning: Proper Maintenance for Longevity of Your Baking Tools
Cleaning your baking tools after each use is vital for maintaining hygiene and ensuring durability. Avoid using harsh chemicals on your equipment; instead, opt for warm, soapy water and a gentle sponge. For wooden tools, such as dough scrapers and rolling pins, it’s best to hand-wash them and refrain from soaking them in water.
Regularly inspect your tools for signs of wear and tear, replacing them as needed. For items like baking stones, allow them to cool before washing, as sudden temperature fluctuations can lead to cracking. Proper care will guarantee that your baking tools remain in excellent condition and ready to assist you in your breadmaking journey.
Storage: Best Practices for Keeping Your Bread-Baking Essentials
The way you store your baking tools can significantly affect their performance. Keep your tools in a clean, dry area, and consider designating a specific space for your baking essentials. For items like flour and yeast, storing them in airtight containers is crucial to preserve freshness and prevent moisture from compromising their quality.
For larger tools, such as stand mixers and baking stones, ensure they are stored in a manner that prevents damage. Avoid stacking heavy items on top of delicate tools. Organizing your baking space will make it easier to locate your essential tools for baking perfect bread whenever you need them.
Upgrades: Knowing When to Invest in New Tools for Enhanced Baking
As you advance in your baking skills, you may find that certain tools no longer meet your needs. Upgrading your equipment can significantly enhance your baking experience. For instance, if you frequently bake, investing in a high-quality stand mixer or a professional-grade oven can save you valuable time and effort.
Keep track of your progress and identify areas where new tools could enhance your baking capabilities. Whether it’s a new baking stone, a set of quality measuring cups, or a digital thermometer, upgrading your equipment can improve your results and provide greater enjoyment during the breadmaking process.
Inspiring Stories and Recipes: Your Journey to Perfect Bread Baking
The adventure of baking perfect bread is filled with inspiration, from artisan bakers to cherished family traditions. Learning from others can ignite your passion for breadmaking and equip you with the tools to create something truly extraordinary.
Insights from Artisan Bakers: Wisdom from Bread-Baking Experts
Engaging with artisan bakers can provide invaluable insights into the craft of bread making. Many professionals are eager to share their techniques, tips, and stories, offering a wealth of knowledge to inspire your baking journey. Attend workshops, watch online tutorials, or read books by renowned bakers to gain a deeper understanding of the craft.
Learning about their experiences, challenges, and successes can motivate you to push your boundaries and explore new techniques. The passion displayed by artisan bakers is contagious, and their commitment to quality can inspire you to elevate your baking skills.
Family Traditions: Cherished Recipes Passed Down Through Generations
Family recipes often hold significant meaning, connecting us to our heritage and loved ones. Baking bread using traditional recipes passed down through generations can evoke nostalgia and a sense of belonging. Reach out to family members to learn their techniques and secret ingredients.
Document these cherished recipes and share them with future generations, ensuring that your family’s baking legacy continues. Incorporating these treasured recipes into your baking repertoire can help you cultivate your unique style while honoring your family’s history.
Innovative Creations: Modern Twists on Classic Bread Recipes
Innovation is key in today’s baking landscape. Don’t hesitate to experiment with modern twists on classic recipes. Incorporating unique flavor combinations, such as herbs, spices, or even fruits and nuts, can lead to exciting new breads that reflect your personal style.
Consider exploring global bread recipes, integrating diverse ingredients and techniques from around the world. This will not only expand your baking skills but also introduce new flavors and textures into your repertoire. The world of bread baking is vast and filled with opportunities for creativity—embrace the journey and let your imagination flow.
Your Frequently Asked Questions About Baking Perfect Bread
What tools do I need to start baking bread?
To kick off your bread-baking journey, you’ll need basic tools such as a mixing bowl, dough scraper, digital scale, proofing basket, and baking stone. These essential tools will prepare you for success.
Can I bake bread without a stand mixer?
Absolutely! You can bake bread without a stand mixer. Many bakers successfully knead dough by hand, which can be a rewarding experience. Just practice proper kneading techniques for optimal results.
How long should I proof my dough?
The proofing duration varies based on the recipe and environmental conditions. Generally, dough should be proofed until it has doubled in size, which may take anywhere from 1 to 3 hours, depending on the temperature.
What is the best temperature for baking bread?
The ideal temperature for baking bread typically ranges from 190-220°C (375-425°F). An oven thermometer can help ensure an accurate temperature for perfect baking.
How can I improve the crust on my bread?
Baking your bread on a preheated baking stone can enhance the crust. Introducing steam into the oven creates a humid environment that promotes better crust development.
What’s the difference between active dry yeast and instant yeast?
Active dry yeast requires activation in warm water before use, while instant yeast can be added directly to dry ingredients. Instant yeast is more convenient and rises faster than active dry yeast.
How do I know when my bread is done baking?
To determine if your bread is fully baked, tap the bottom of the loaf; it should produce a hollow sound. Alternatively, use an instant-read thermometer to check if it has reached an internal temperature of about 90°C (190°F).
Can I use whole-grain flour to bake bread?
Yes, whole-grain flour is suitable for baking bread. It contributes a nutty flavor and nutritional benefits, but due to its higher bran content, it may require adjustments in hydration.
How do I store my homemade bread?
To maintain freshness, store your homemade bread at room temperature in a paper bag or bread box. For longer storage, consider freezing slices for later enjoyment.
What are some common mistakes to avoid when baking bread?
Common mistakes include using expired yeast, inaccurately measuring ingredients, and neglecting proofing times. For the best results, pay close attention to details and follow recipes closely.
Connect with us on Facebook!
The post Baking Perfect Bread: Essential Tools You Need appeared first on https://cookinggods.com
The Article Essential Tools for Baking Perfect Bread Was Found On https://limitsofstrategy.com
The Article Baking Perfect Bread: Essential Tools You Need First Appeared ON
: https://ad4sc.com


Comments are closed